
DIY : FROM 2 IDENTICAL SKIRTS TO 1 BAD ASS BODYCON DRESS
- Nma

- Mar 20, 2020
- 3 min read
This is the story of how I happen to own 3 identical pencil skirts. I got one first and it became my “one nation“ skirt because I wore it all the time. It fit very well and was versatile enough to go with any outfit to any event. You know - not too long, it too short, not too bright, not too dark, not too tight, not too loose - just perfect. So of course it made perfect sense to make duplicates since it was such a life saver. I’m really not sure why I made 2 extra instead of just 1. I really do t remember loving the skirt that much. Smh
Anyway, I hardly wear skirts these days so one skirt is more than enough. I’m going to be showing you how to transform the two identical skirt into one little blackish dress.
Materials
2 identical skirts
Buttons and loops
Straps (got mine off an old bra)
Thread
Sewing machine
Fabric chalk
Measuring tape
Ruler
Scissors
Measurements needed
*For accuracy, take these measurements standing straight. Better still, get someone to measure you.
*When taking horizontal measurements (bust,waist,hips) place the tape firmly around the fullest part of the area to be measured. Make sure the tape is not too tight and not too loose
around the area.
- Chest to waist measurement - measure vertically from your chest which is the just about your breasts to your waist line.
- Desired dress length - measure vertically from your shoulder point to the point on your legs where you want the dress to stop.
Note - Because the fabric stretches and the skirts were already my size, I didn’t bother with horizontal measurements.
10 easy steps...
Step 1
Measure and mark 2 points 10 inches from the top of the first skirt and draw a straight line across the marked points.

Step 2
Measure half an inch from the above line and draw another line. Cut along this line. This cut out is the top half of the dress.

Step 3
On the second skirt, Measure and mark your desired skirt length and cut This is obviously the bottom part of the dress.

Step 4
On the back side of your top piece, take straight lines from the top of the dart line down to the bottom of the piece as seen in the picture below.
Step 5
On the front side of the top piece, measure and mark 8 inches from the top. That represents your bust line. From that point on the dart, create a mirror dart.
Step 6
On the side seam, starting from that same 8 inches point, sew a straight line down to the waist line synching in about an inch at the waist line.
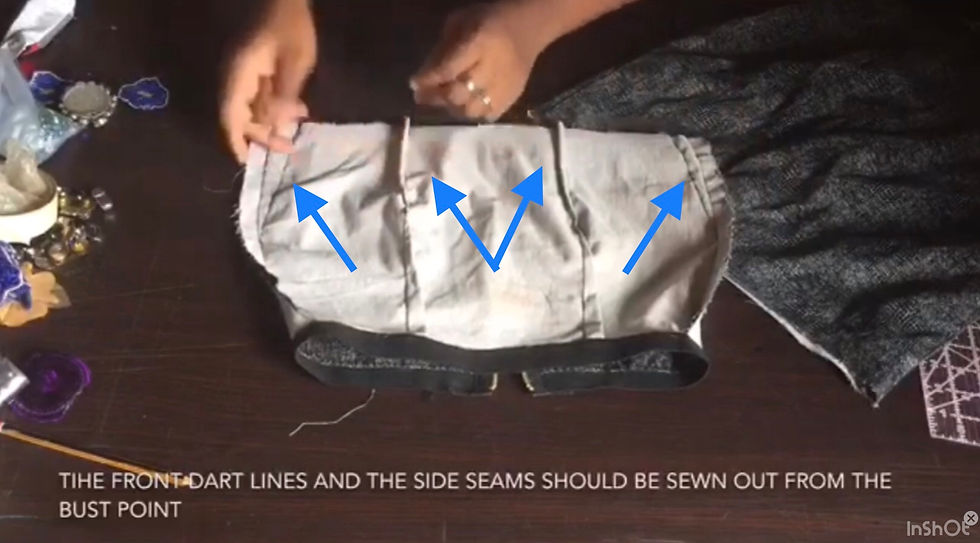
Step 7
Take off the zipper of the top part and then join the top and skirt pieces together

Step 8
Attach buttons and loops at the back of the top piece where you took off the zipper from. I made my loops by folding a strip of bias and the. Cutting them into strips then Sewing them unto the dress in a loop form.

Step 9
Hem the bottom of the dress. When hemming a stretchy fabric be sure to pull the fabric as you hem so that the stitch accommodates the elasticity of the dress.
Step 10
Add straps. I cut off the straps of an old dress and attached to the new dress using the dart lines as a guide.
Final Look!

Please see video below
Enjoyed this blog post? Share it with a friend!
Replicating this DIY? Tag me on the gram!
Have any other questions? Leave them below and I’ll be sure to respond!
Roll the credits xx

Comments